ForeUI is an easy-to-use UI prototyping tool, designed to create mockup / wireframe / prototypes for any application or website you have in mind.

ForeUI Blog

ForeUI V2.27: Multilevel Menu Element

Hello everyone, today’s new version will include a brand new “Multilevel Menu” element, I bet you will like it 🙂

Multilevel Menu Element

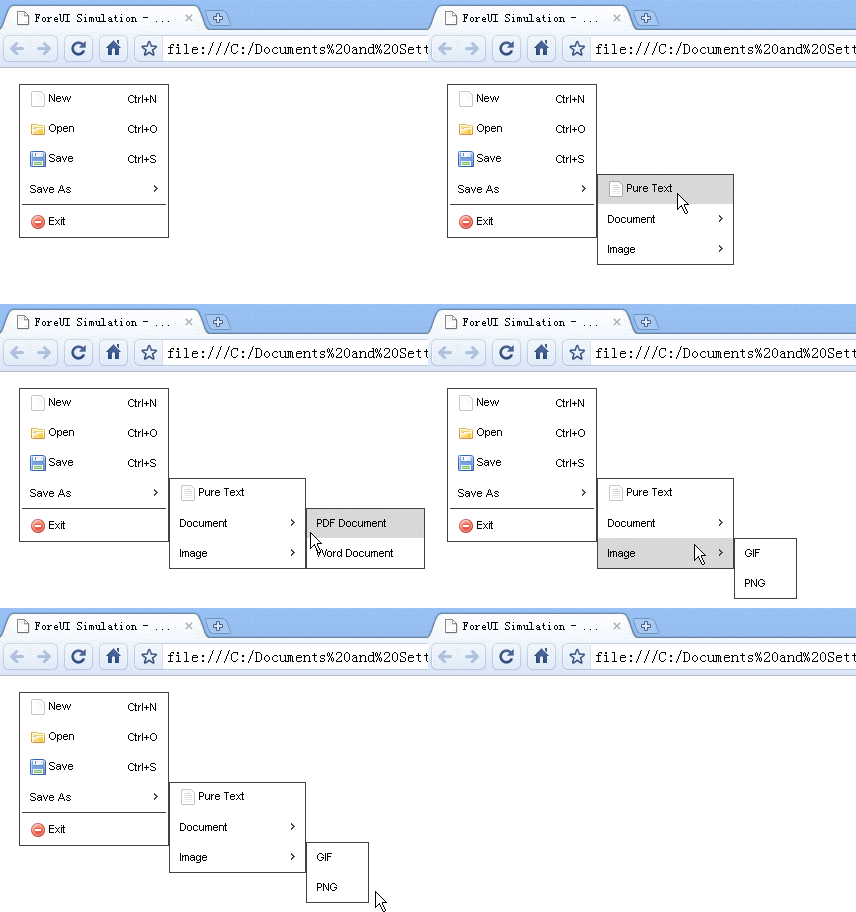
The inspiration to add this element is from Ulrich’s thread about 2 months ago.  I know he is making a lot of clickable wireframes with ForeUI.  He said creating a multilevel menu in (older version of) ForeUI was quite complex, since you have to show/hide the sub menus by yourself, and the simulated menu is not so “real” since you must click the parent menu item to expand its sub menu…  All these are solved with the new “Multilevel Menu” element!  Now creating a multilevel menu is extremely easy: just drag the element into your plot and edit its content in this format:

  • Main Menu Item 1
  • Main Menu Item 2
    • Sub Menu Item 1
    • Sub Menu Item 2
  • Main Menu Item 3

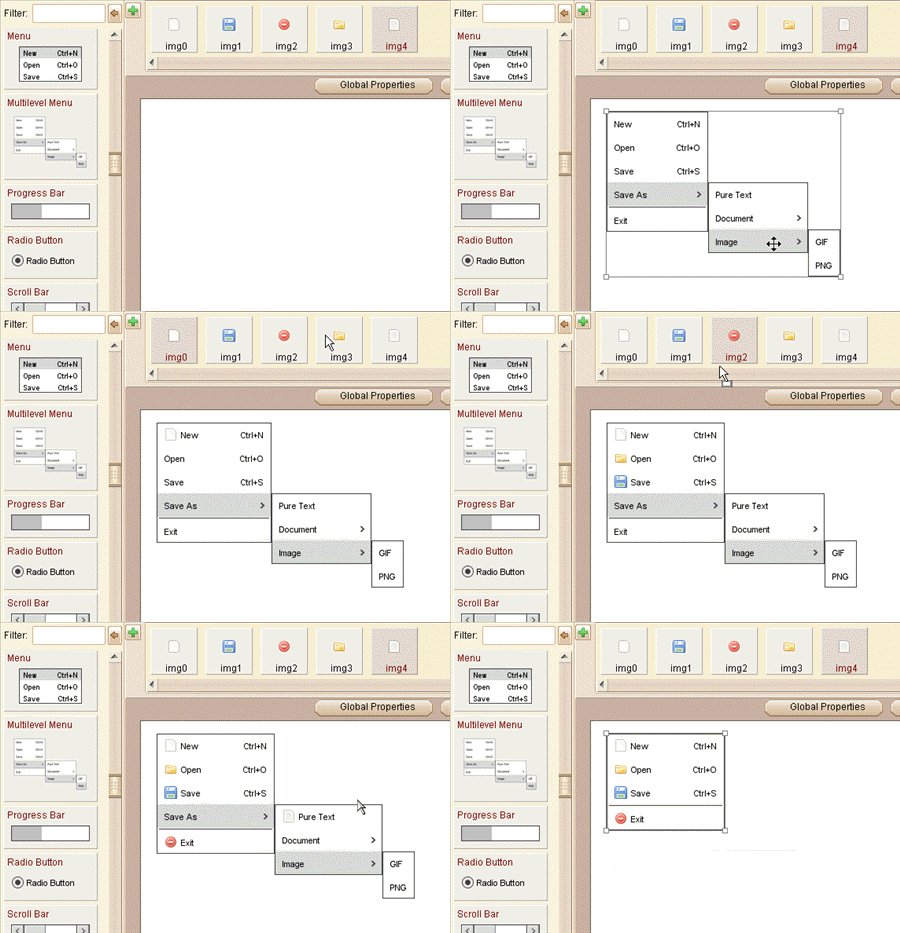
This will generate the two-levels menu automatically, the sub menu will be bound to the second item in the main menu.  What’s more, you can click the menu item to select/unselect it, or expand/collapse the sub menu, or drag an icon from image dock to a menu item…all these can happen in the editing mode!

The more interesting thing happens when you run the simulation: the multilevel menu element will work like a real menu, and the sub menu will be expanded when you move your mouse over its parent menu item.

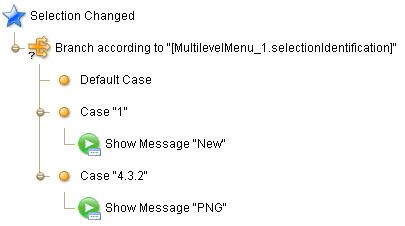
When you choose an item from the multilevel menu, the “Selection Changed” event will be triggered, you can handle this event can check its selection identification, which will be a string like “a.b.c”.  Here is an example:

In the example above, the case “1” means user selected the first item in the level-1 menu;  Case “4.3.2” means user selected the second item in the level-3 menu, which binds to the third item in a level-2 menu, and that level-2 menu binds to the fourth item in the level-1 menu.  Please pay attention to the quote marks for each case, as the identification is not a number but a string.

Button Margin

This feature is requested by Kenneth Young via email.  In previous versions, all button elements will have a 15 pixels margin, that value kind of big if you want to make a small button.  Now we provide the option to tweak this value for button element.

Other Enhancements:

  • Do not auto expand tree nodes in the pages management window. (Requested by Hervé Séger via email)
  • When manipulating the behavior tree, only expand the nodes that are modified.

Fixed Bugs:

  • Bug_0196: Duplicate page with table that contains multiple embedded elements, some embedded elements may dispear. (Re-fixed, thank Kenneth Young for the reporting)
  • Bug_0197: Table edit: clear content for all cells and press ok, the application may hang.
  • Bug_0198: Can not change the state of TextBox with action during the simulation. (Thank Ulrich for the reporting)
ForeUI V2.25: Table Editor Improvements and More

Hello everyone,  it is another biweekly update today.  The new V2.25 version has some improvements on new table editor, provides smarter zooming and proxy settings and  includes some bug fixings.

Table Editor Improvements

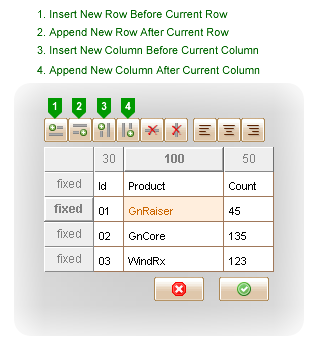
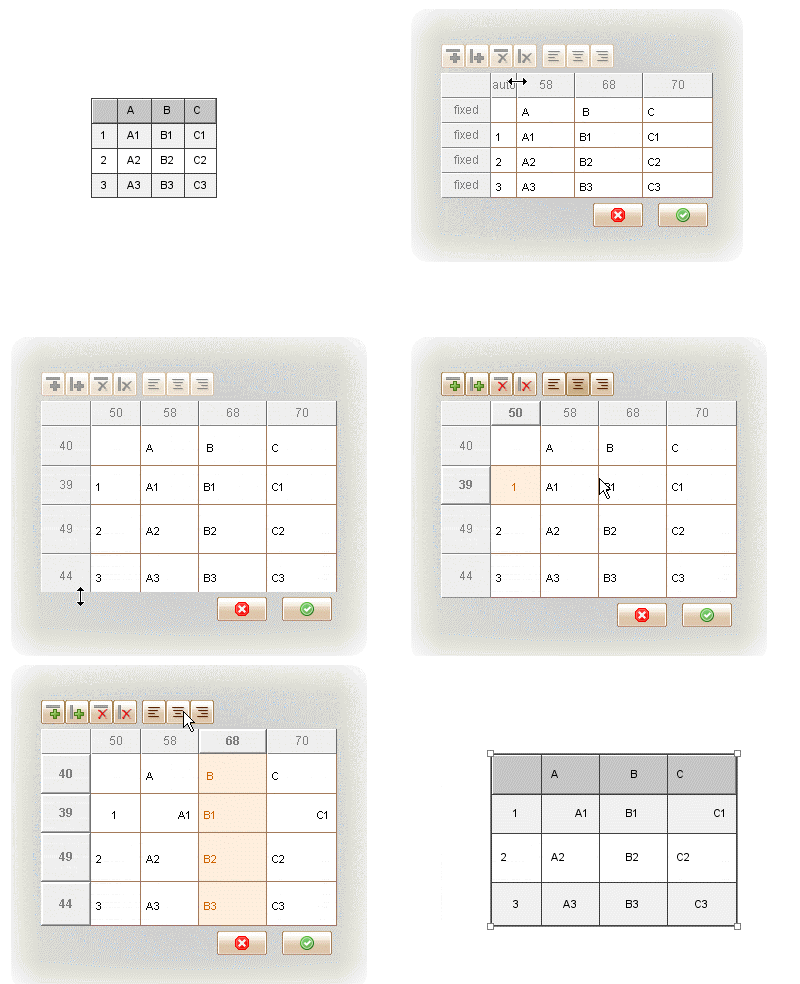
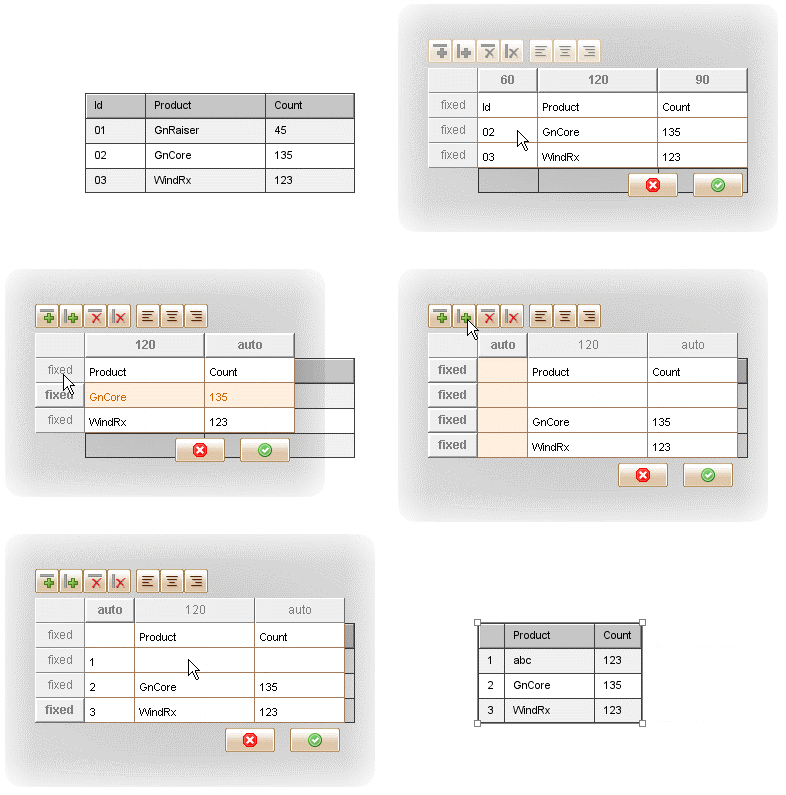
In previous version, the table editor can only insert new row or column before the current one.  Now we’ve made the improvement, you can append new row or column after the current one.  The figure below shows the details:

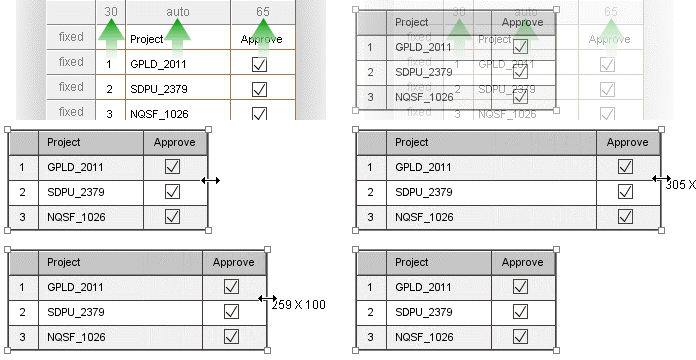
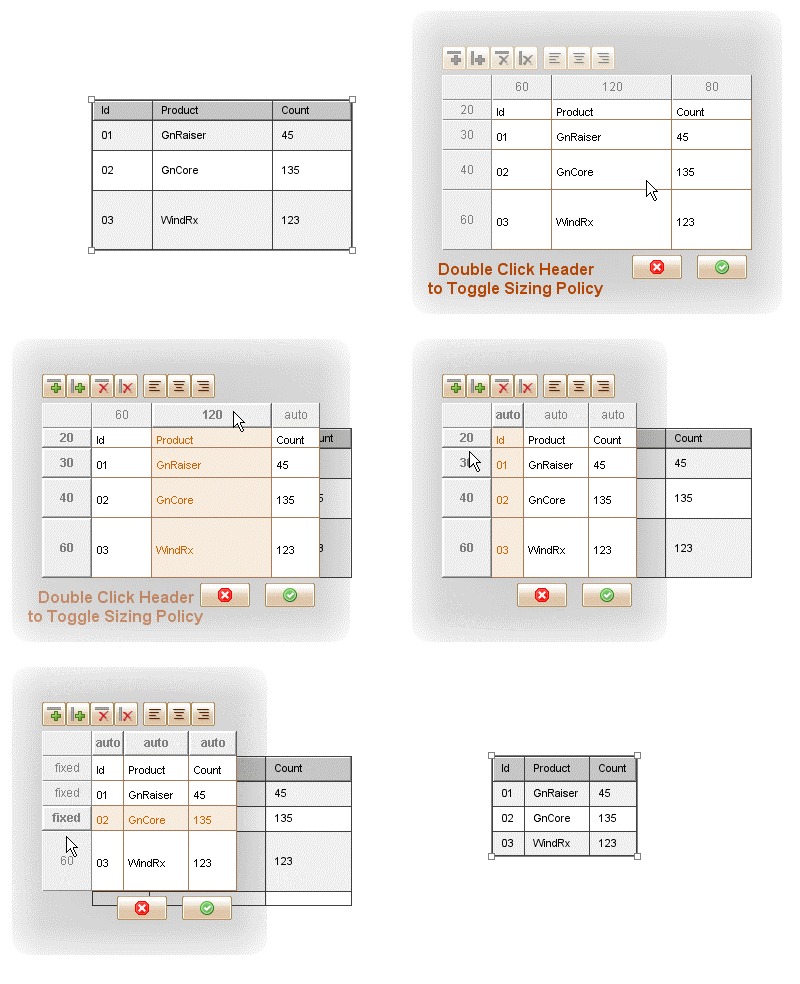
Also we’ve made an enhancement on table resizing:  only the columns with “auto” width will be scaled during the table resizing.  That means you can fix certain columns’ width during the resizing.  The columns with “auto” width will allocate their actual width from the remained space.  If more than one column has “auto” width, they will allocate their widths according to their content.  So you can add some space characters into table cell to increase its acutal width.

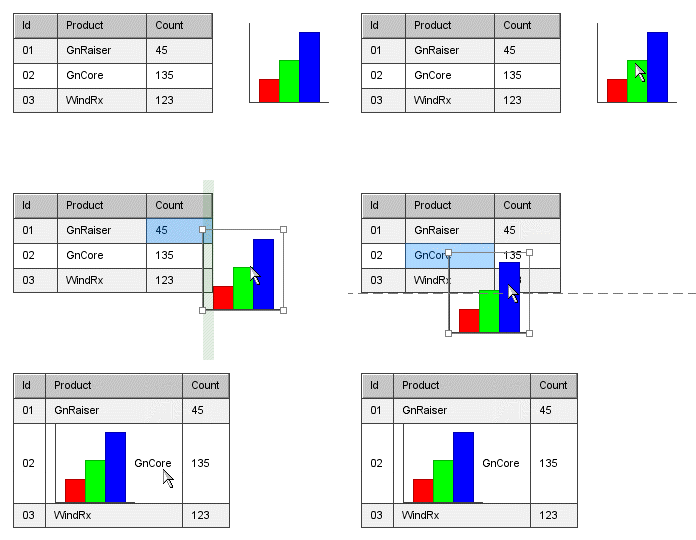
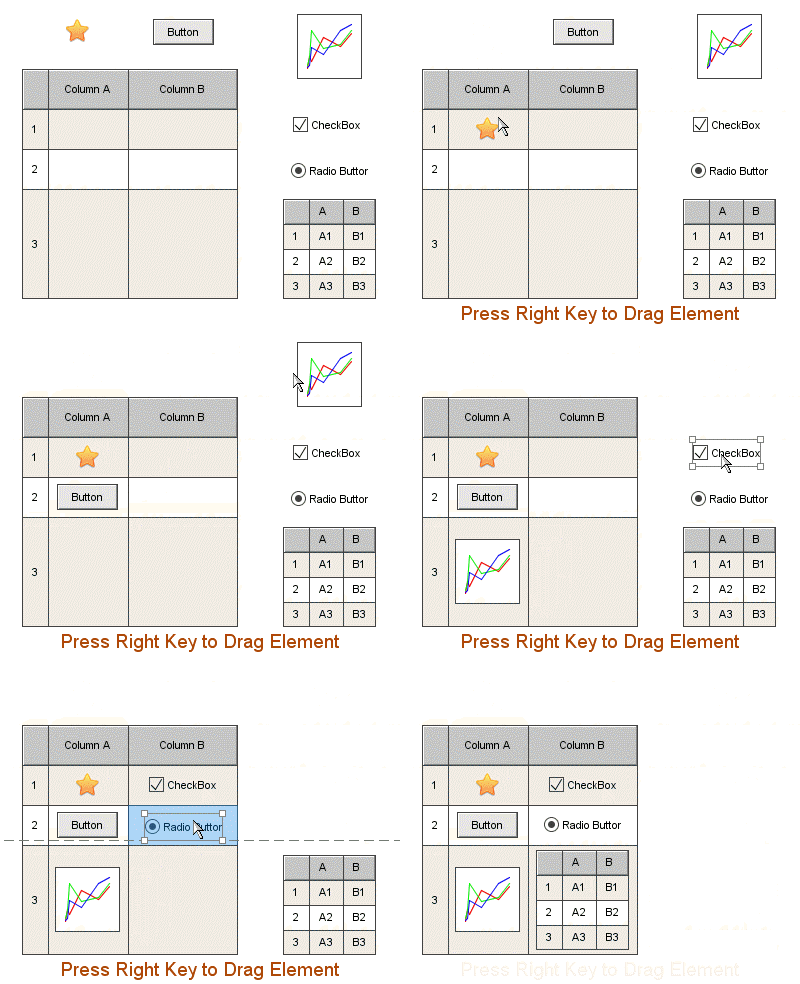
Another enhancement is to auto enlarge table cell (and table) if the table cell is not big enough to hold the newly embedded element.  This feature will be activated after you hold right key to drag an element into the table.  If you want to use this feature, please make sure to turn on the “Auto resize eement after editing its content” option in the settings window.

Smart Focusing after Zoom In/Out

In previous version, after zooming in or out, the view will scroll back to top left corner.  If you are editing something on the bottom right corner, you will have to scroll back after zooming.  Now the zooming become smarter:  it will try to restore the center region you were working at; If you have selected some element, it will try to put them in the center of the view.

Proxy Settings

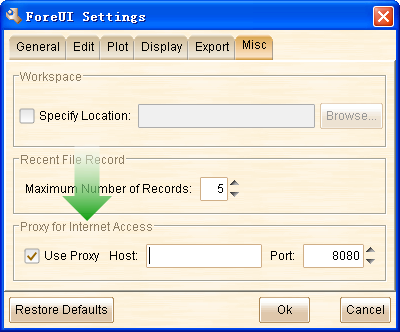
This feature is requested by Kfir Dadosh.  Sometimes ForeUI needs to get data from internet (update checking, download resource etc), so the proxy settings are needed in some cases.  Now you can find the proxy options via menu “Advanced->Settings->Misc Tab”:

Other Enhancements:

  • When try to export DHTML to existed directory, clean the directory first (requested by Hervé Séger via email).
  • Add “Extract from Container” option in context menu for embedded element (requested by Ulrich).

Fixed Bugs:

  • Bug_0188: Table cell with comma will be splited into two cells.   (Thank Ulrich for reporting)
  • Bug_0189: “Element Clicked” event is not triggered when clicking the table row.   (Regression in V2.22, thank Kenneth Young for reporting)
  • Bug_0190: Do nothing in table editor and press ok button, the table is marked as “modified” (while actually it is not).
  • Bug_0191: Table element may contain broken reference to deleted element, which cause error in DHTML generation.
  • Bug_0192: Rename embedded element will make it dispear from the container.
  • Bug_0193: Hand drawing theme should respect the background color of button element.  (Thank John Giddings for reporting)
  • Bug_0194: The action indicator (red flag) on Table element is not clickable (regression in V2.22)
  • Bug_0195: Should not resize table after editing if “auto resizing option” is off, or preferred size is not bigger than current size.
  • Bug_0196: Duplicate page with table that contains multiple embedded elements, some embedded elements may dispear (Kenneth Young reported via email).

ForeUI V2.22: Nesting Mechanism and Enhanced Table

3

Hello everyone, tomorrow is the one-year birthday of ForeUI!  So today’s release (V2.22) must be a big one 🙂

Although the version number is not increased so much, this version is really a major milestone.  From this version, a brand new “Container” concept is introduced into ForeUI, that means we can embed element into another one.  

Container for Nesting

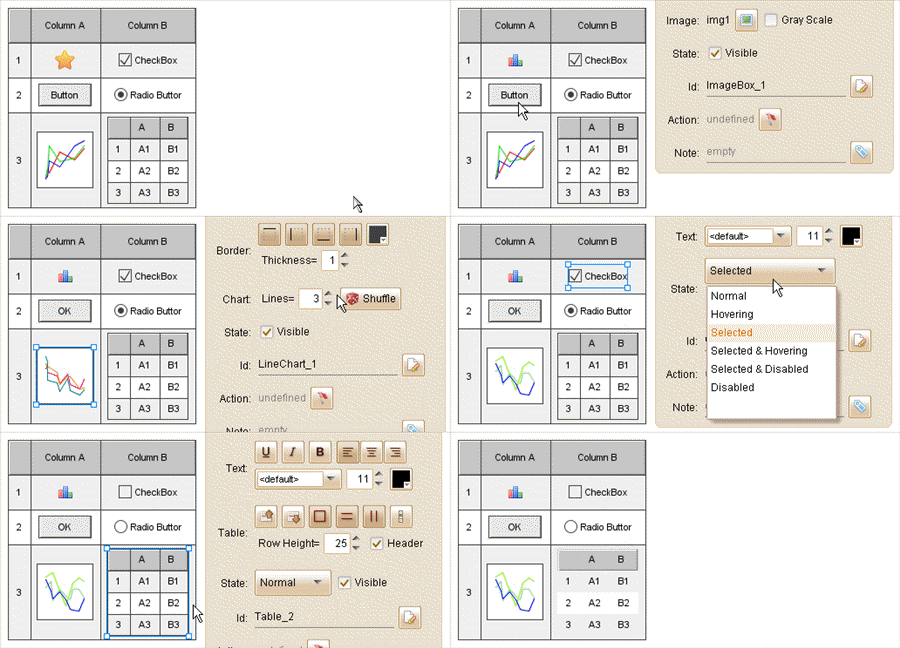
Table Element becomes container now, you can press right key to drag another element into the table cell.

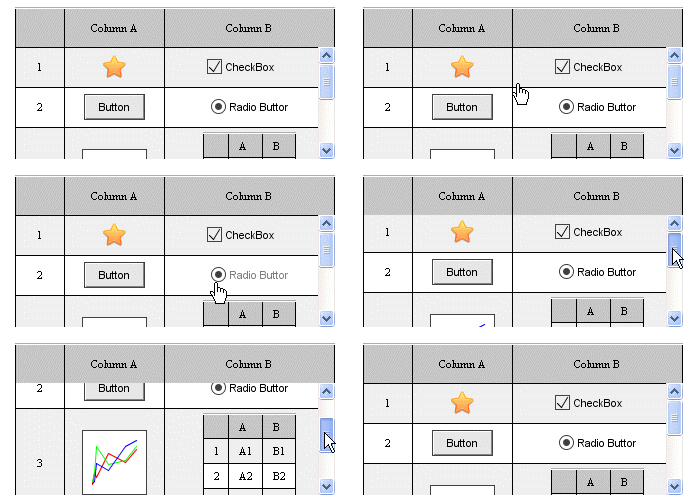
The embedded elements really belong to the container table, if you set the table scrollable and run the simulation, the embedded elements will be scrolled together:

The embedded elements are still selectable, so you can still tweak the elements even if they are embedded into the table cell. 

You can also extract the embedded element from the container by clicking the  button in the floating tool pane. 

Element Group can also work as a container, you can select the member in group and adjust its properties without ungrouping the Group.  That’s really convenient 😉

Brand New Table Editor

This version also bring us a brand new table editor, which allows you to specify the table row height and column width.

You can drag the header to resize the column or row, you can also double click the header to toggle the sizing policy.  The default sizing policy of column width is “auto”, which means allocate the size according to the content.  The default sizing policy of row height is “fixed”, which will use the default table row height.

In the editor you can also add/remove any row or column.  You can hold the Ctrl key to select multiple cells and manipulate them.

What’s more, you can also specify the cell alignment respectively.  If no cell alignment is specified here, the default table alignment will be used.

Fixed Bugs:

  • Bug_0185: Line element can not be rendered correctly in IE if the element width or height less than 20.  (Thank pohldoug for reporting)
  • Bug_0186: Should not hide the text editor when clicking its semitransparent border.
  • Bug_0187: In Mac OS, press CMD+R to launch simulation. When return to the application, the element selecting is not working properly.

Edit on 2010-04-28:

We have released an unoffical update V2.23 for bug fixing purpose.  Details here: http://getsatisfaction.com/easynth/topics/unofficial_release_v2_23_for_bug_fixings

ForeUI V2.20: Zoom In and Zoom Out

Hi everybody, it is Monday again 🙂   This time we bring you the zoom in/out feature, which will help you a lot when you want to tweak the details of the wireframe or preview the whole design.   The V2.20 also contains some enhancements and bug fixings (see below).

Zoom In / Out

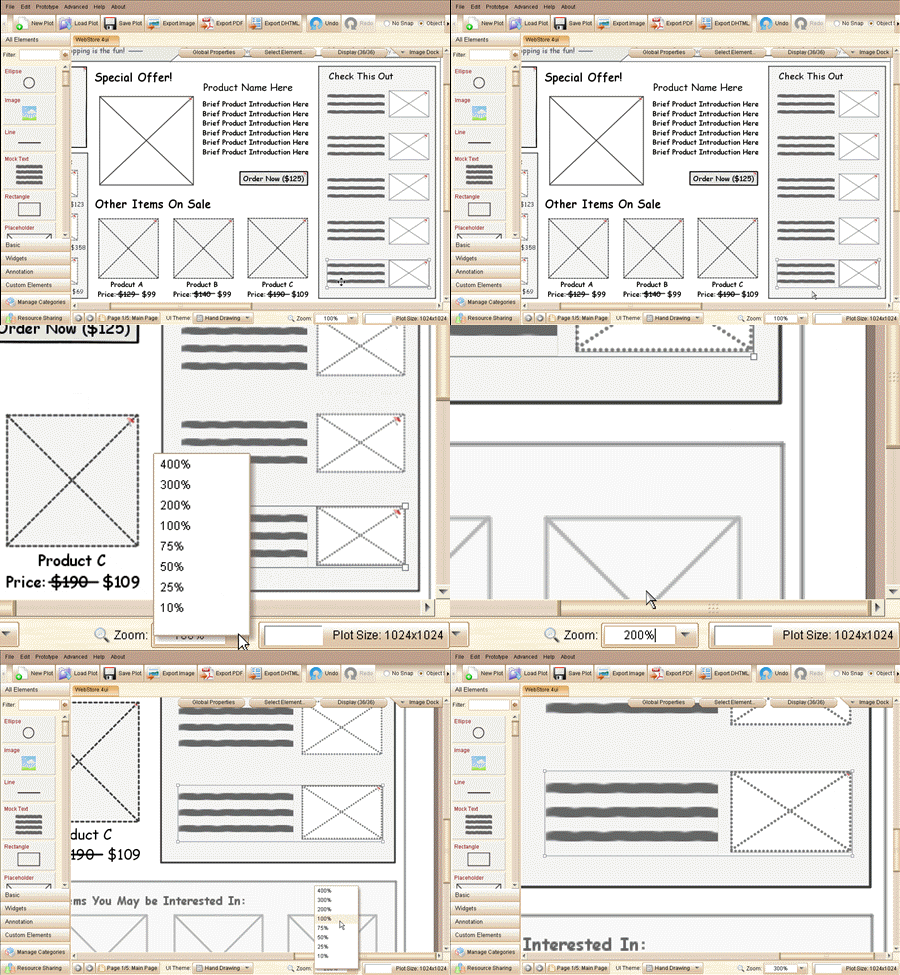
This feature is requested by Jeffrey Werner about 6 month ago, and we also received similar requests from other channels (email, twitter etc.).  Now you can choose the zooming scale from the list at the bottom right corner, you can also input any percentage value for zooming:

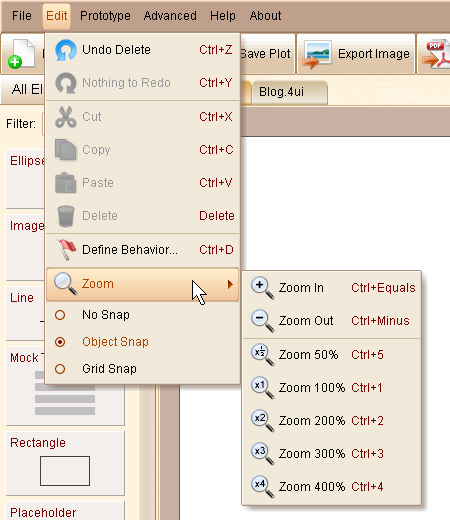
 It is also possible to change the current zooming scale from the menu:

As you can see in the popup menu, you can use hotkeys to change the scale as well:

  • Ctrl =: Zoom In (Cmd = in Mac OS)
  • Ctrl -: Zoom Out (Cmd – in Mac OS)
  • Ctrl 1: Zoom to 100% (Cmd 1 in Mac OS)
  • Ctrl 2: Zoom to 200% (Cmd 2 in Mac OS)
  • Ctrl 3: Zoom to 300% (Cmd 3 in Mac OS)
  • Ctrl 4: Zoom to 400% (Cmd 4 in Mac OS)
  • Ctrl 5: Zoom to 50% (Cmd 5 in Mac OS)

Smartly Update Custom Event Name

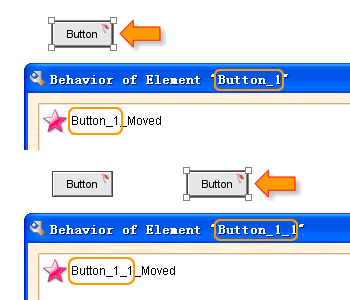
This is quite useful enhancement.  When you duplicate an element with some custom event handlers defined, if the custom event name contains the id of the element, the id part will be replaced with new id automatically.

This is quite useful if you need an element has its exclusive custom event:  just use the element id as prefix of the custom event name.  You can pack such an element into custom element, thus it can always handle its own event, no matter how many instances are created.

Here is an example.  It is an interactive slider element (you can download it from the community).  It has its exclusive custom event “TextBox_Slider_AdjustPos”, which starts with the element id “TextBox_Slider”.  So you can create as many instances of it as you want and they will not interfere each other.

Text Editor Placement

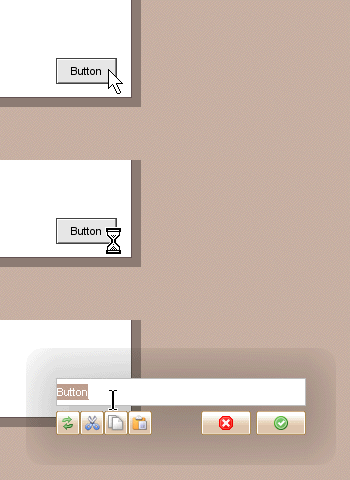
In previous versions, the text editor for editing text element is not allowed to exceed the bounds of the plot.  That’s not reasonable and inconvenient.  Now we improve it a little bit and don’t restrict the text editor placement so tough:

Other Enhancements:

  • Ajust the text positioning for all text elements.
  • Do not bring the progress window to top when exporting in progress.  (Thank Remco Douma’s suggestion)
  • Show warning message when trying to load a plot created by higher version.  (Thank Tim’s suggestion)

Fixed Bugs:

  • Bug_0180: Set the date of Calendar element to the last day of the month, all buttons after the date will be filled incorrectly.
  • Bug_0181: Arrow Line element is not rendered properly in simulation.  (Thank Jeremy Kerr for reporting)
  • Bug_0182: TextBox with initial invisible state can not really become visible via “Change Visibility” action.
  • Bug_0183: Add custom element to user-defined element category and restart the software, the category will be lost.  (Thank pohldoug for reporting)
  • Bug_0184: “Set Global Cursor” action does not work for Rectangle and some other elements since V2.17.   (Thank Jeremy Kerr for reporting)

Simulate Drag and Drop with ForeUI

From V2.17 ForeUI supports the drag and drop simulation.  This post will introduce how to make element draggable.  Just remind that if you want to simulate a draggable window, that will be quite easy: just check the “Draggable” option for the Window element.

From V2.17 all elements can become draggable.  What you need to do is to handle the mouse events properly.

Before going deep into the details, lets take a look at the analysis of drag and drop behavior (drag from P1 and drop to P2):

During this process, there will be three mouse event triggered orderly: Mouse Down, Mouse Move and Mouse Up. To simulate the drag and drop behavior, we need to handle these mouse events in this way:

  • Mouse Down:
    • Mark the current status as “dragging”.
    • Cache the current location P1 as the dragging start point
    • Cache the current location of the element that being dragged as the element origin
  • Mouse Move:
    • Calculate the current offset against the dragging start point (P1), and move the element base on its origin and the offset.
  • Mouse Up:
    • Mark the current status as “not dragging”.

In the community you can find a Draggable Container custom element. If you place it in your plot, it will become draggable in simulation. Here is an example.

Actually it is a TextBox element. It becomes draggable because it handle mouse events as above. Here is its behavior definition:

As you can see, the dragging status, dragging start point and element origin are stored in global properties. The most important action is the “Move Element” action, it move the TextBox to this new location:

NewX = ElementOriginX + CurrentCursorX – DraggingStartX

NewY = ElementOriginY + CurrentCursorY – DraggingStartY

One thing should be noticed is the three mouse events are not fully the same than those we mentioned before. The “Mouse Move” is replaced by “Global Mouse Move”, and the “Mouse Up” is replaced by “Global Mouse Up”. Let’s make a comparation for these events:

Events
Native Mouse Event Global Mouse Event
Mouse Down
Mouse is pressed on the element. Mouse is pressed anywhere.
Mouse Move
Mouse is move on the element. Mouse is moved anywhere.
Mouse Up
Mouse is released on the element. Mouse is released anywhere.

From the table above you can see the “Mouse Move” and “Global Mouse Move” is quite similar, but the global event will be triggered no matter where the mouse cursor is. Here is an example to show the reason to use “Global Mouse Move” and “Global Mouse Up” instead of “Mouse Move” and “Mouse Up”:

Let’s say we have two elements: A and B. B has a higher z value. When we drag element A towards B, B will cover A since B has higher z value. When this situation happens, element A can not receive the “Mouse Move” and “Mouse Up” events since element B intercept them. To avoid this situation, we should use “Global Mouse Move” and “Global Mouse Up” events.

Once you understand the mechanism to simulate drag and drop, you will find that all elements can be dragged if you’d like to. Here is an example for drag and drop simulation, you can download its .4ui file from the community.