ForeUI is an easy-to-use UI prototyping tool, designed to create mockup / wireframe / prototypes for any application or website you have in mind.

ForeUI Blog

Some Tips for ForeUI Simulation

In ForeUI, we can define the behavior of elements and run the simulation in web browser.  Here are some tips about running the simulation:

If you have defined multiple pages in a plot, you can use “Page Up” and “Page Down” key to switch the pages, even if you havn’t defined any behavior of elements.

If you are running ForeUI in Windows VISTA and your are not using an administrator account, you may meet a “Page Not Found” error in your web browser when launching the simulation.  That’s because ForeUI need the right to create a folder for storing DHTML files.  The workaround is to run ForeUI in administrator account, or to assign the right to ForeUI application.

If you meet any problem in using ForeUI, please feel free to contact us, we are making an FAQ page for ForeUI.

ForeUI Online Demo Available!

2

From now on, ForeUI has its online demo! That means you don’t have to download and install the package if you just want to take a tour;   You can just click the link to launch the demo and try all features of ForeUI.

Actually the online demo is a Java applet, usually your browser already has its running environment.  In case your browser does not support Java, you can try this link, it will auto-detect and install the Java environment for you.

The online demo has almost 100% the same features than the native installation, except the URL visiting:   In native installation, if ForeUI need to visit a URL, it will bring up a browser window and browse the URL in it;  In online demo, when ForeUI try to visit a URL, it will pop up a small window, showing the target URL and allow you to copy the URL to the clipboard, which can help you to paste it to your browser.

visit_url

Another difference between online demo and native installation is the prototype examples:  the native installation include some interesting examples and customzied elements;  the online demo has no example though.  We may provide a download site for the example resource latter.

Using Customized Element in ForeUI

The customized element is supported from ForeUI V1.20.  Here is an article to introduce this new featue.

It is for sure that we will add more and more elements into ForeUI, but our policy is NOT just to expand the library as big as possible.  Since we believe that the huge library will bring the inconvenience to user: too hard to find the element to use.   So we’d like to provide the essential elements for prototyping, which is flexible to be customized.

For example, we only provide a “TextEditBox” element in ForeUI, but actually it support “Mutirow” and “Encrypt” properties, which can make it become a multiline text edit area or password input field.

Also we provide the facility to keep your customization or future usage, that is what we call “Customized Element”. In the article you can learn how to create, manage and use the customized elements.

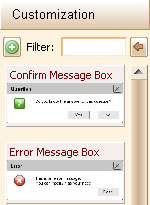
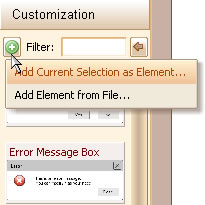
To quick start, click the “Customization” button on the bottom left corner of ForeUI to check the new element category:

customization_category             customization_menu

Create Interactive Prototype with ForeUI

I have just put a new article to introduce the interactive simulation feature in ForeUI.

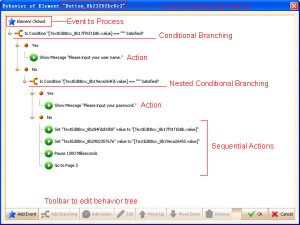
The key point to create interactive prototype is to define the behavior of element, i.e. create a tree structure to represent the workflow of event handler, like the figure below:

behavior_editor

So far there are 3 kinds of nodes in the tree: Event, Branching and Action.  An event handler should include Event and Action, maybe with optional branching.

In the article, I create 3 small examples to demonstrate the facilities, you will see how to define the behavior of element step by step to make it interactive during the simulation.  This tutorial is basic, actually we have much more content to introduce, I will put the advanced skills in another article.

I believe the fastest way to master ForeUI interactive simulation is to try it, just click the run-sim button to see what’s happening 🙂

I hope this article is helpful for you, please let me know if there is anything unclear.

Milestone: ForeUI V1.20 Released!

I am so proud to announce that ForeUI V1.20 is released today.  Different than previous minor update versions, V1.20 is really a milestone!  Many important features are available from this version, here is the list:

  • New Feature: Interactive simulation on web browser.
  • New Feature: User customized element supported.
  • New Feature: Export prototype to DHTML.
  • New Feature: Allow adding note to element.
  • New Feature: All elements support visible property.
  • New Feature: Text edit box support multirow property and encrypt property.
  • Enhancement: allow closing the page management dialog by clicking the plot area.
  • Fixed Bug_0044: Save plot file may meet exception.
  • Fixed Bug_0045: Caret display incorrect when text edit box is empty.
  • Fixed Bug_0046: Changing UI theme should affect all pages.
  • Fixed Bug_0047: Without copying first, cut an element then undo the action, exception will occur.
  • I can not introduce all these features detailly today, instead I will write some other articles to do that.  The most important new features are the first two:  Interactive Simulation & Customized Element Support

    As we promised before, ForeUI provides interactive simulation feature now.  The prototype will be simulated as DHTML and run in your web browser.   It is definitely different than slide show, it is interactive so that your prototype can provide real user experience.

    Customizing element is also important, we can create our own element now!   The customized element can have its behavior, so it is not only a reusable GUI but also a reusable logic component!  The customized element will be stored as *.fce files, the installation package contains some examples in the “customize” folder (they are some message windows, you can close the window by clicking the button on it in simulation mode).

    More details will be introduced latter 🙂