ForeUI is an easy-to-use UI prototyping tool, designed to create mockup / wireframe / prototypes for any application or website you have in mind.

ForeUI Blog

Lazy Loading of HTML5 Simulation

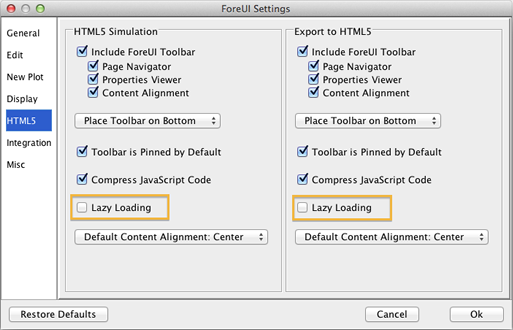
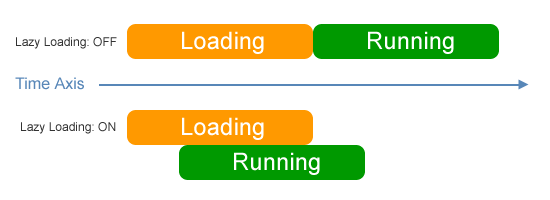
Since ForeUI V3.0, there is an “HTML5” tab in the settings window, and we can make some configurations for the HTML5 generation.  As shown in the figure below, there are two columns of configurations, and they have the same content.  The difference is that, the left column is for running HTML5 simulation (clicking the “Run Simulation” button in ForeUI), while the right column is for exporting HTML5 (clicking “Export HTML5” button in ForeUI). Most of the settings in this window explain themselves, except the “Lazy Loading”.  This option is turned off by default, which means all contents in the simulation have to be loaded by the web browser before showing the first page.  You will see the loading page before the entire loading process is done.  If the simulation is big and complex, you may have to wait for a long time, which is bad.  In this case, you can consider turning this “Lazy Loading” option on.  It will try to display the first page as soon as possible, and keep loading the rest part of simulation in the background.  If you load the simulation with a web browser that has status bar shown, you will see the loading progress like this: The first page of simulation will appear when all its content are loaded.  You can review and interact with the page and wait for the loading of other pages.  If reviewing the first page takes some time, the next page may have been loaded in the background before you switch to that page.  Thus we reduce the actual loading time for the simulation.
The figure below explains how the “lazy loading” option works:

What if the target page is not completely loaded when we try to show it?  This can happen if “Lazy Loading” option is turned on.  In this case we will see the loading page appears again and we have to wait for the loading of that page.

If the loading time of your simulation is acceptable, you don’t need to turn on the lazy loading.  If you want to shorten the loading time, you can try to turn the “Lazy Loading” option on.

I should mention that using a faster web browser (e.g. Chrome) will be a good solution to accelerate the simulation loading.  However it may not be acceptable in some cases.
Special Offer: Save 20% Before Christmas!

Dear all, Christmas and new year is coming.  I’d like to represent the entire ForeUI team to wish happiness to you: Merry Christmas and Happy New Year!

During the last 10 days before Christmas, we offer 20% discount to everyone who are interested in buying ForeUI license.  You can find more details here.

ForeUI Discount: 20% OFF

If you want to pay via RegNow, you can also use the “FOUI-I9FP-DISC” coupon to get the same discount.

We are going to enter the “lite” working mode.  We may work less at the end of the year, but it is still a working mode, so do not hesitate to contact us if you have question/suggestion/comment in mind 🙂

ForeUI V3.10 is Released!

ForeUI V3.10 is released on 5th December, 2012.  We have made a lot of optimization in this version and now it becomes much faster and smoother.  What’s more, there are some exciting new features and enhancements.

Import Plot

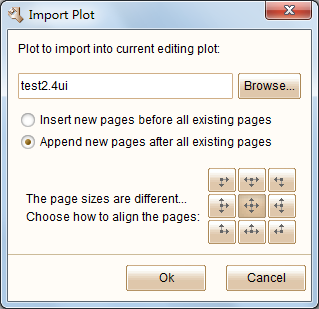
This feature is designed for team collaboration.  Your team members may work on different parts of the design as different plot files.  Finally you may wish to merge all plots together, and here is the way to go.  You can use the “Import Plot” feature to Import another plot into the current editing plot.  You can decide where to place the new pages (before or after current existing pages), and you can specify how to align the new pages with the old ones (if they have different size).

This feature is available in the “File” menu.  The “Import Plot…” item will be enabled if you have at least one plot opened for editing.

Background Image

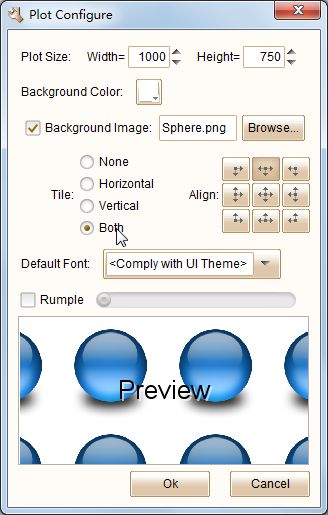
From this version, you can specify the background image for the entire plot.  You will be able to find some new options after clicking the “Plot Settings…” button on bottom right corner.  The background image can be tiled horizontally, vertically or in both directions.  You can also configure how to align the background image with the page.

Compatible with Mountain Lion

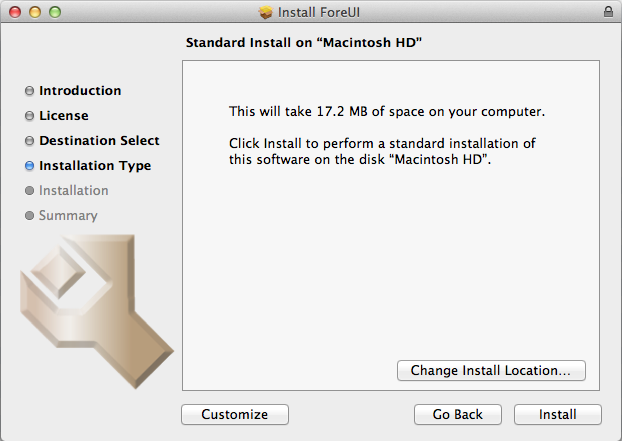
We have a blog post about the issue when running ForeUI in Mountain Lion (Mac OS X 10.8).  Now the problem is solved.  ForeUI application is signed with Apple Developer ID certificate now, and you will get smooth experience when installing ForeUI into your Mountain Lion system.

What’s more, we have fixed some minor issues and made some improvements for Mac OS system.  We even created a new installer for it:

Input Element Id in Chooser

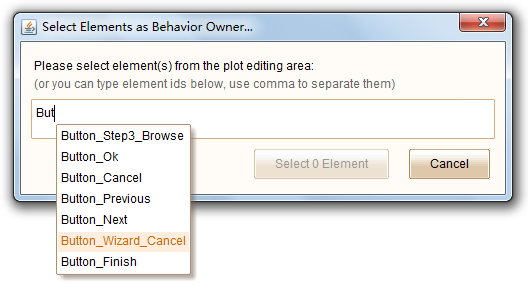
In previous versions.  When the element chooser is shown up, you will need to select element in the plot editing area.  If the target element is covered by other elements, or it is in another page, it will take you some time to find it out.  Now you have another choice: you can directly input the element’s id in the chooser.  You don’t have to remember all the IDs, just start typing the prefix of the id and you will see all candidates are listed, which is fancy 🙂

When the content assistance pops up, you can use the UP and DOWN keys on keyboard to choose the one you want.  Of course you can use mouse to select the element from the list.

Other Changes

There are more content in this update.  You can check out this page to see other new features, enhancements and fixed bugs in this release.

Simulate Multi-Threading in ForeUI

1

ForeUI offers a powerful behavior engine, which allows you to define complex interaction in an elegant way for any GUI element on the screen.  Sometimes you may want to run multiple tasks parallelly, which is also called “multi-threading” in the software industry.  For example, assume we have a button, and we want to move it on right-down direction and enlarge it at the same time.  Is it possible to do so in ForeUI?  The answer is positive, that’s why I write this post 🙂

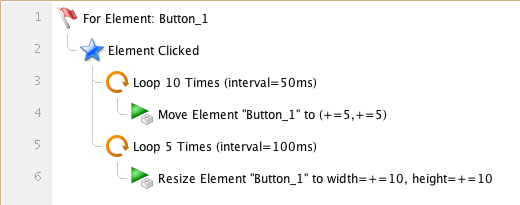
First let’s create a single-thread version for the example, so you can later compare it with the multi-threading version.  The example only contains one button element (Button_1) and its behavior is defined as below:

There are two loops in the event handler for “Element Clicked” event: one for moving and one for resizing the button.  I designedly use different looping parameters for them, so we have good reason that not to merge them into one loop.  Since it is a single-thread version, it can only do the moving and resizing in sequence, like this:

You can download the plot file for single thread example, or view its simulation here.

Now lets try to make the multi-threading.  The basic of the trick is that, the event triggering is not a blocking call.  That means, when you trigger two events in order, the second event will not wait for the execution of event handler for the first event.  As a non-blocking call, triggering an event takes almost no time, so the two events seems to be triggered at the same time, and their event handlers seems to be launched together.

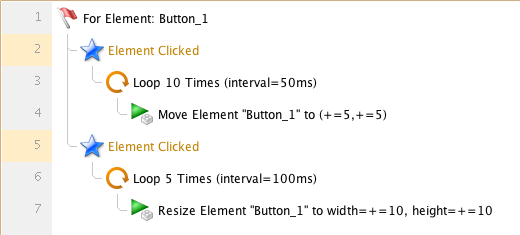
So I changed the behavior for Button_1 as below.  I added two “Element_Clicked” events to Button_1 and they will do moving and resizing accordingly.  There are two warnings (highlighted with yellow) since we place the same event twice in one element.  We know what we are doing, so just ignore these warnings.

Since the two loops are placed in different event handlers, they will be launched at (almost) the same time, thus you will see they are executed parallelly:

You can download the plot file for multi-threading example, or view its simulation here.

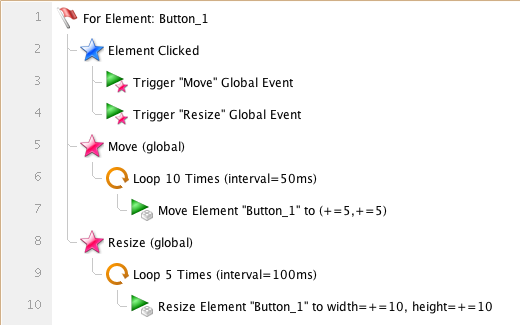
If you’d like to place the behavior definition in custom event handler, you can modify the example like this:  (download this plot file)

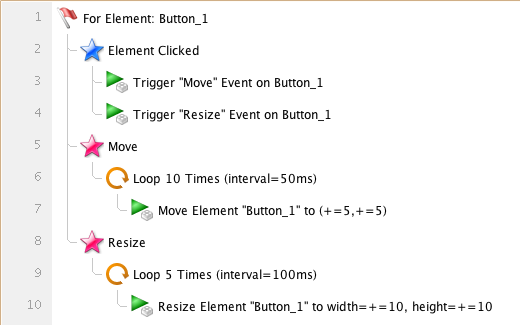
If you don’t want to use global custom event, you can define it as the private event for Button_1, like this: (download this plot file)

The three examples above will work in the same way, you can choose the one you like when you want to do multi-threading in ForeUI.

Maybe you already know that ForeUI will convert the behavior to Javascript when exporting plot to HTML5.  If you search “Javascript Multithreading” on the Internet, you will learn that Javascript does not actually support multi-threading (at least for now).  So all multithreading in Javascript are tricks, they are just simulating the concurrent execution.  However, if you have ever tried to manually write some Javascript code to simulate the multi-threading, you will see how difficult it will be and how easy to make mistake somewhere.  You will realize that ForeUI saves you a lot of time on achieving this 😉

ForeUI V3.0 Official Released!

The official release of ForeUI V3.0 is delivered today.  Comparing with the previous releases, this version is more focus on the reliability and usability.  However, there is still an exciting new feature in this version, which is called “integration task” that can easily integrate ForeUI with other tools.

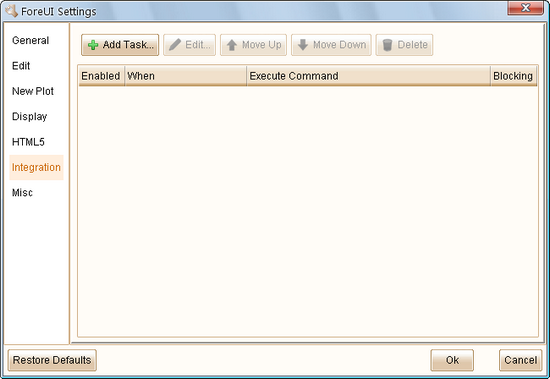
You may already know that you can invoke ForeUI via command line to generate image or HTML5 simulation.  However, have you considered to use other tools to process the file(s) generated by ForeUI?  The integration task is designed for that purpose.  In the settings window, you will see a new tab named “Integration”, which allows you to manage the integration tasks.

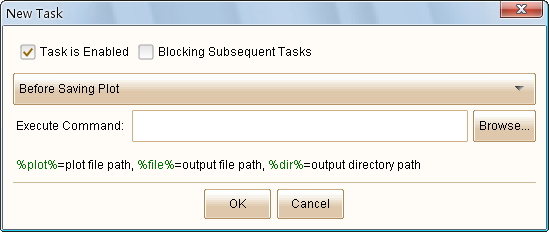
You can click the “Add Task…” button to add a new integration task.  Here you can specify the parameters for the task.

If you unselect the “Task is Enabled” option, the new task will be created but not take effect immediately, until you enable it later.

If you select the “Blocking Subsequent Tasks” option, the new task will block the workflow until the command is finished.  This is useful when you want to execute a serial of tasks in order.

You will need to specify the condition that trigger the task.  So far ForeUI supports these conditions:

  • Before Saving Plot
  • After Saving Plot
  • Before Export HTML5
  • After Export HTML5

You can input or browse the command to be executed, and you can use the variables below in the command:

  • %plot%: the file path of the current editing plot.
  • %file%: the path of the output file.  For Before/After Saving Plot task, it will be the path of plot file to save; For Before/After Export HTML5 task, it will be the path of generated HTML file.
  • %dir%: the path of the output directory.  For Before/After Saving Plot task, it will be the path of directory to save plot file; For Before/After Export HTML5 task, it will be the path of directory that store the generated HTML files.

By making use of the integration task, you can invoke other tools to process the file generated by ForeUI.

Example:  Auto Commit Plot File to SVN Repository

Some customers have asked for the version control feature.  Now we can have it by integrating ForeUI with SVN.  If you are not familiar with the usage of SVN, you can find some tutorials via google.

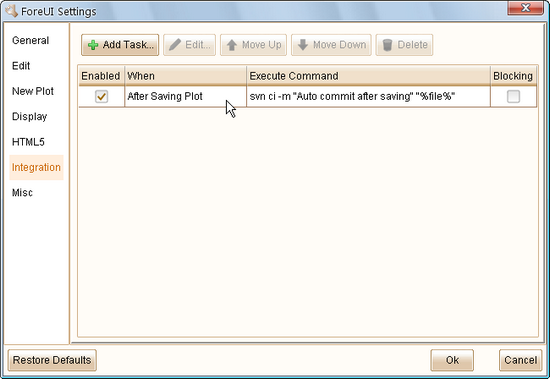
Assume that you want to commit the plot file to SVN repository everytime after you save the plot.  First you should add your plot file into a project, and checkout your project to a local directory.  Then please open the plot with ForeUI and go to the “Integration” tab in settings window.  You can create an integration task like this:

That’s all, every time you save your plot, it will be committed to the SVN repository, so you will never lose your work, theoretically 🙂

If the plot file is not added into your SVN project, the command above will do nothing.

Remarks: the integration task feature is available for registered user only.

Other Enhancements and Bug Fixings:

Please check out this page to see the complete list of enhancements and fixed bugs in this version.