ForeUI is an easy-to-use UI prototyping tool, designed to create mockup / wireframe / prototypes for any application or website you have in mind.

All posts in ForeUI

ForeUI V3 Forecast 1: Reference Element

3

First of all we have to say sorry to whom are waiting for V3.0.  We are still working hard as we were, the new version is delayed because of some technical problems and force majeure.  We appreciate your patience and understanding.  Today the new version is not available yet, but we are entering the last phase before the delivery, the 3.0 beta should be delivered in May.  I will write some blog posts to introduce the new, exciting features in coming V3.0.

PS: recently we were frequently asked if newly bought license can be used in 3.0, our answers are “Yes”, since the paid user will have one year free upgrade period, including major updates.  So if you buy ForeUI license now, your license key can be used in V3.0 when it is released.

There are many new features in 3.0, today we will introduce one of them: Reference Element.  This is a actually killer feature, it is not just cool, it is a real time saver for creating big prototype project.  The new element, just as its name implies, can “point to” another element and emulate its appearance and behavior, i.e. work as a reference of that element.

When you drag the Reference element from element list into the editing area, its default look may like this:
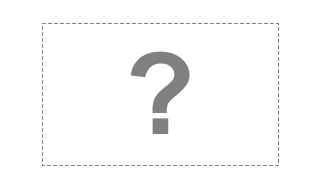
Default look for Reference Element

The big question marks in the center implies that it does not point to any element yet, you can specify the target element from the tool pane:

Sepcify Reference Target

After selecting the target element, it will simulate the original (target) element’s look.  For example, you select a TextBox as the original element, then you will see:
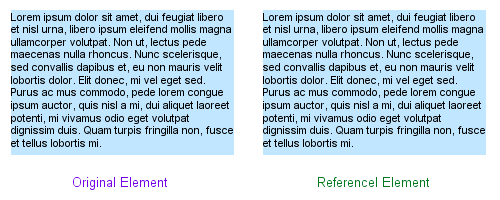
They look totally the same.  But wait, it is not a static clone, when you modify the content of the original element, the reference element will change its content accordingly.  What’s more, you can move or resize the reference element as you need, without affecting the original element!
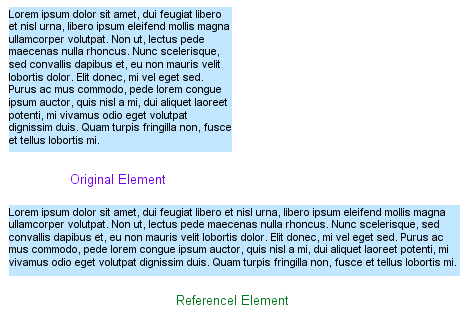
As you can see, the reference element can override the location, size and visibility properties of the original element.  This will be extremely useful when you need to create a set of elements with same content but with different layout parameters.

Reference element is not just a rendering trick, it actually emulate the behavior of the original element in the simulation, and keep synchronizing their state on the fly.  Please take a look at the example below:
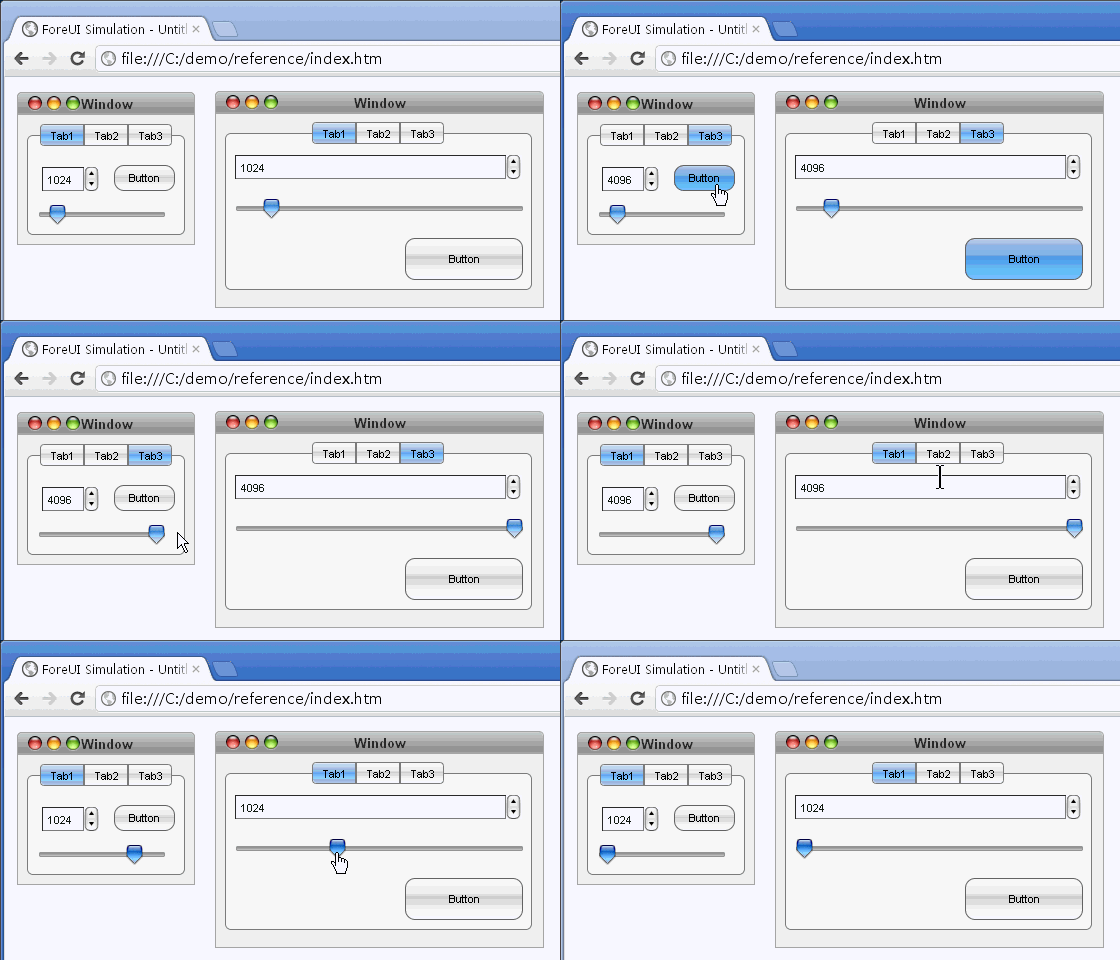
Although the reference element can be interactive, you don’t need to define any event handler for it, since it will trigger event on the original element.  For example, when you click a reference button, it will trigger the “Element Clicked” event on the original button, thus the corresponding event handler will be invoked.

Reference element is also a good idea to share element between multiple pages.  Comparing with using master page, Reference element is much more flexible and will be suitable for more actual cases.  The Reference element can partially cover the requirements of “multi master page”, which are discussed here.

That’s Reference element, hope you will like it 🙂


Minor Updates: V2.801 ~ V2.810

It has been 4 months since V2.80 is released.  Since we are working on V3.0, we have not implemented new features during these four months.  However we received some bug reports from our support forum and release minor updates that include the bug fixings.

2011-06-08: Minor update V2.801:

  • Bug_0307: The borders of Table element in hidden page are still visible.
  • Bug_0308: Could not right drag (or CTRL+drag) Table or Tree from element list to working area.

2011-06-13: Minor update V2.802:

  • Localization: German translation update to V2.72.
  • Bug_0309: Click image in image dock, the “Use By: ? elements” information in popup menu is not correct (only current page is taken into account).

2011-07-16: Minor update V2.803:

  • Bug_0310: Select text element with non-default font, execute the cut and paste commands, the font combo box incorrectly get focus.

2011-08-18: Minor update V2.804:

  • Bug_0311: When performing selection, the embedded element should not enlarge the testing area of its container.
  • Bug_0312: Single row TextEditBox should not auto wrap its content in editing mode.

2011-09-01: Minor update V2.805:

  • Bug_0313: Single row TextEditBox with “center” or “right” alignment does not render the text.

2011-10-03: Minor update V2.806:

  • Bug_0314: Apostrophe in ComboBox element will be displayed as “'” in IE.
  • Bug_0315: Editing any node in action editor will remove its note.

2011-10-04: Minor update V2.807:

  • Bug_0316: Elements that embeded into Table are not rendered correctly since V2.806.

2011-10-27: Minor update V2.808:

  • Bug_0317: Mac OS X: double clicking plot file to open ForeUI, the plot may not be loaded correct.
  • Bug_0318: Can not use action to append row to Table that does not have any row initially.

2011-12-08: Minor update V2.809:

  • Bug_0319: Can not paste image from clipboard under Mac OS X Lion.

2012-02-18: Minor update V2.810:

  • Bug_0320: Copy and paste a Window or Tree element in the same plot, its embedded elements will have duplicated IDs.

Thanks for the users that report thoes bugs, it’s you who makes ForeUI better and better!

You are welcome to report bug or share idea with us on the forum, or via email.

Troubleshooting ForeUI Simulation

ForeUI can convert your prototype to HTML+JavaScript simulation, which can be directly reviewed in web browsers.  Since ForeUI is not as smart as people, it could not recognize the incorrect syntax input in any field that supports expression, at least for now.  If your prototype contains incorrect expression, it will be converted to incorrect JavaScript code, which may halt your simulation in browser.

If you find your simulation does not work as your expected, especially some elements do not respond your input, you will need to troubleshoot your simulation and fix the expression in your plot.  The primary problem is to find out which element has incorrectly defined actions.  The troubleshooting is not difficult at all, you don’t have to be a programmer to understand the process.

Preparation

Although we don’t need to go deep into JavaScript code to find out what happened, we still need a JavaScript debugger to locate the problem.  Most web browsers have their built-in debuggers or plug-ins for debugging purpose.  You can choose one of the following combinations for debugging:

  1. Firefox + Firebug  (plug-in, can be downloaded here)
  2. Chrome + JavaScript Console  (built-in, press Ctrl+Shift+J to activate)
  3. Safari + Error Console  (built-in, here is how to activate it)
  4. Opara + Error Console  (built-in, press Ctrl+Shift+O to activate)
  5. IE + Script Editor  (component from Office, here is the How-To)

The Firefox + Firebug combination is my favorite, and I will use it as example.  If you use other debuggers, the GUI of debugger may vary but the main idea is still the same.

Example Plot Creation

I create a simple plot to demonstrate the troubleshooting.  The plot has only one page and there are three buttons inside.  As shown below:

Every button has almost the same behavior: when it is clicked, it shows a message “I am button N” (N=1,2,3).  I intended to insert an error in the second button:

As you can see, I inserted an additional double quotation marks at the end of the message to show.  Since the double quotation marks is not escaped and it can not find the pairing in the message, it will be kept in the message and break the syntax of the script and halt the simulation.

Troubleshooting

When we run the simulation in Firefox (with Firebug installed and activated), Firebug immediately detect the syntax error and show it in Firebug console.

Clicking into the green link and the source code that has syntax error will be highlighted in a pop up window:

Here we don’t need to understand what’s wrong with the code, just find out where the problem is.  As highlighted above, the error is in a function started with “Button_2”, which means the error happens in Button_2.

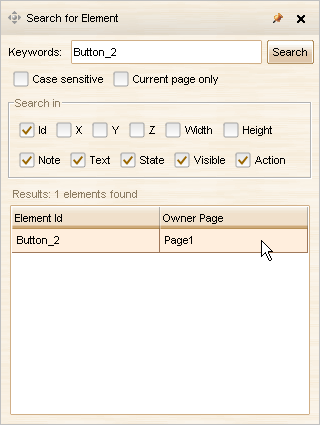
For such a simple plot, we can definitely find out where the Button_2 is.  If the plot is big and complex, we will need to search Button_2 in the plot.  Just press Ctrl+F to open the search window and input the keyword “Button_2” to search:

Clicking on the search result will bring us to the page and select the target element.  We can press Ctrl+D to review its action definition.

With the help from JavaScript debugger, we can quickly narrow the problem and locate the problematic element, and then have it fixed.

Basic and Tricks for Custom Element Creation

Supporting custom element is one of the killer features of ForeUI.  This article will introduce the basic knowledge and advanced tricks of custom element creation.

Custom Element Creation

When you are editing your plot, you can always select some elements on the page and pack them as your custom element for future usage, by clicking the  button in floating tool pane (as shown below):

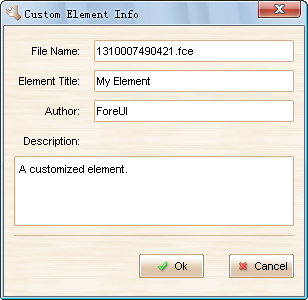
You will be asked to input some information of the custom element.  File name may not be so important if you are just saving a custom element for your own usage.  You will be able to find the saved custom element file (.fce) in the “<UserDir>/.foreui/customize” directory, where the <UserDir> is your user directory in your system.  It will be good practise to input a meaningful element title and description.

After clicking the “Ok” button, your custom element will be listed in the “Custom Elements” category (you can find it in the “All Elements” category as well).  Then you can use it like standard elements.

Functional Custom Element

When you select some elements to create custom element, if the selected elements have behavior defined, the behavior will be packed into custom element as well.  That means the custom element can have its own function.

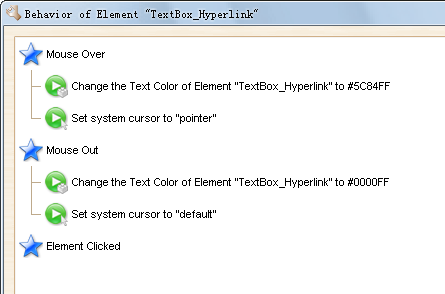
A good example is the “Hyperlink” custom element, which is included in ForeUI installation.  You can find it in the “Custom Elements” category, if it is not there, try to load the “Hyperlink.fce” file in the “Custom Elements” category.  This custom element is based on the Text Box standard element,  and it is functional since it has defined some event handlers:

As shown in figure above, it handles the “Mouse Over” and “Mouse Out” events to change its text color and the cursor shape (to simulate a hyperlink).  “Element Clicked” event handler is created but it is still empty, you can add some actions that need to be executed when hyperlink is clicked.

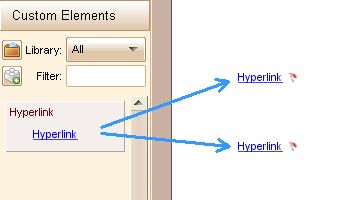
The behavior definition is quite “smart”, if you add several instances of Hyperlink custom element into page, each one will have its own behavior, and the corresponding content will be updated as well.  For example, you added two instances of Hyperlink custom element:

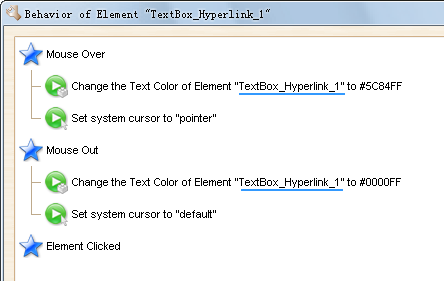
The first instance of Hyperlink will have the id “TextBox_Hyperlink”, and the second instance of Hyperlink will be  renamed to “TextBox_Hyperlink_1”.  If you check out the behavior of the second instance, you will find its content has be updated to:

As you can see, the behavior definition of each instance is separated, and they will not interfere each other.

Use Separated User Defined Property and Custom Event

You may already know that, the user defined property and custom event are all in global scope.  If you like to define them in your custom element, you will have to consider what will happen if multiple instances are created.

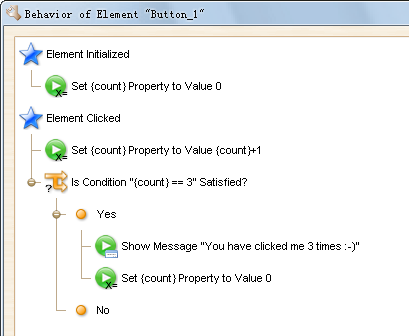
For example, you defined the behavior of a button like this:

It maintains a user defined property named “count”, so a message box will be shown when you click the button 3 times.  If you pack this button as custom element, you will find it works well when it has only one instance in your plot, while it doesn’t work correctly if multiple instances are created, since all instances are using the same global property “count”.

ForeUI does not support user defined property with element scope.  Fortunately we have workaround for this case: use the element id as the prefix of global property, thus it become unique for the current element.

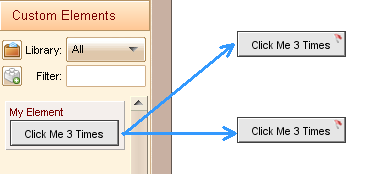
Let’s pack the button as a custom element, and see what happen if multiple instances are added.

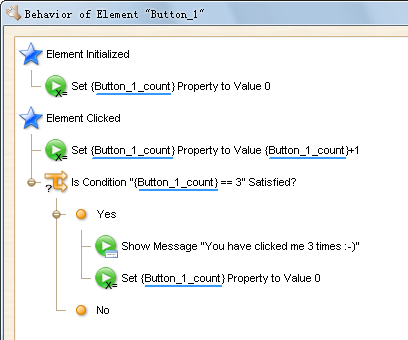
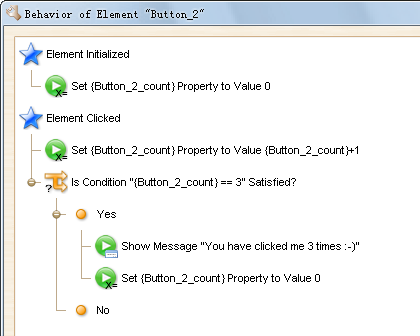
If you check out the second instance of the custom element, you will see its behavior has been changed to:

As you can see, the user defined property name has been updated, thus it is still unique for the new instance.  By using this trick, the custom element can also work well with multiple instances.

This trick is also applicable for custom event.  If you have a custom event defined in a custom element, and wish it become unique for every instance of the element, you can use the element id as the prefix of the custom event name.

How to Make Your ForeUI Plot Smaller?

The design/development of ForeUI V3.0 is just started, and I have some time to write something.  I plan to write a series of articles to introduce some advanced tricks of ForeUI usage, which will be very useful for all ForeUI users.

Today’s topic is: how to make your ForeUI plot smaller?  The “plot” here means both the saved .4ui file and the exported DHTML simulation files.  The benefits to make plot smaller is obvious:  smaller plot can be loaded/saved faster for editing, and smaller simulation files can be launched quickly in your (and reviewers’) web browser.  Here are some tricks to minimize your plot size:

Use Master Page to Avoid Duplication

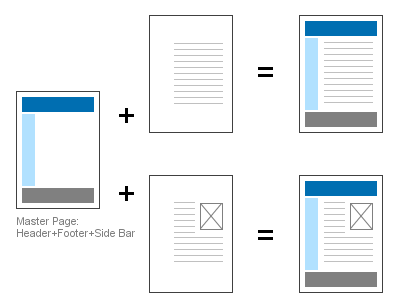
Usually there will be some common parts between pages in your plot.  Although you could duplicate elements or even the entire page to make every page have the common parts, you are encouraged to move the common parts to a master page, which can be shared by other pages.

This trick is frequently used for pages that have the same header, footer or side bar.  For example, all pages in your plot has the same header, footer and side bar.  So you can place them in a page, and all other pages use this page as the master page.  Thus you can just manage the center content on other pages, the figure below shows the details.

What if some pages have different side bars, while they have the same header and footer?  In this case you can use this master hierachy:
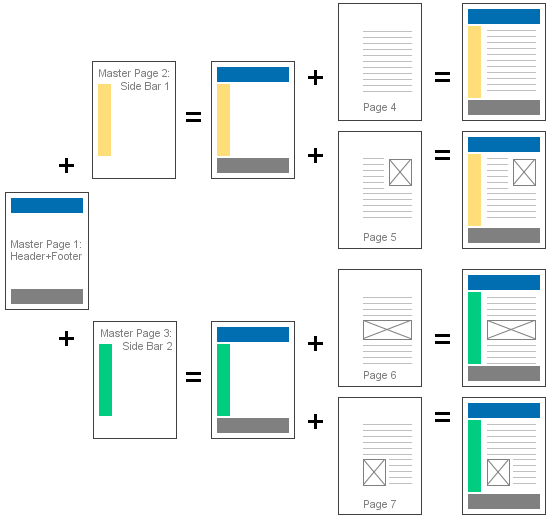
There are 3 pages are used as master pages.  Master Page 1 is shared by Master Page 2 and 3, while Master Page 2 is shared by two pages (Page 4 and 5) and Master Page 3 is shared by another two pages (Page 6 and Page 7).  This hierarchy should meet the requirements for most web site/app prototyping.
By using master pages, you can avoid duplicating content in the plot, and significantly reduce your plot size.

Optimise Image Usage

Experiments show that using images is the best way to enlarge your plot.  So if you wish your plot become smaller, make sure your plot only includes the images that are necessary.  It seems superfluous words, who would like to include unnecessary images in the plot?  But sometimes you may do this unconsciously, consider this case:  you add an Image Box element and specify an external image file for it, after a while you delete that Image Box and forget it.  But the image is still stay in the Image Dock, and will be saved to plot file even it is not referenced anymore.  If you did this a lot, your plot will be quite big, although most of the images in Image Dock are not used actually.

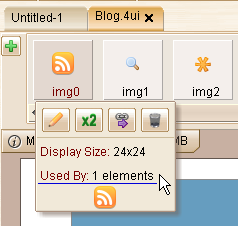
Shouldn’t ForeUI just take care of this situation and optimize it automatically?  I can’t agree more, so we will have it in V3.0, but we still have to do the optimization manually before 3.0 is out.  How to know if an image is referenced then?  You can click on the image in Image Dock, then you will see a pop-up menu like this:

You can see how many elements are referencing this image.  If an image is not used by any element (used by 0 elements), you can just click the  button to remove it safely.  Remarks: you will need to update to V2.802+ to have the correct image reference number (fixed Bug_0309).
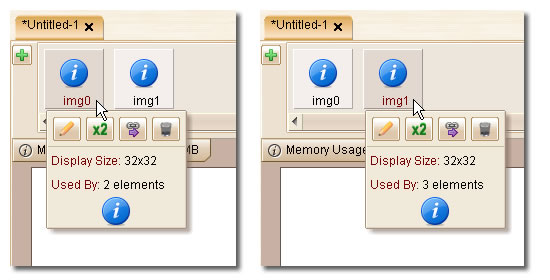
Besides removing the unused images, you can also merge the duplicated images in Image Dock, which will also reduce your plot size.  Again ForeUI V3 will provide this feature, but we need to do it manually for now.  For example, say you have two images (img0 and img1) in Image Dock, they are duplicated and any of them are used by other elements, how could you merge them?

You can choose one image to keep, and click the button for another image to change all references to the one will be kept.  For example, you like to keep img0 (merge img1 to img0), you can click the button for img1, then you will see this window:
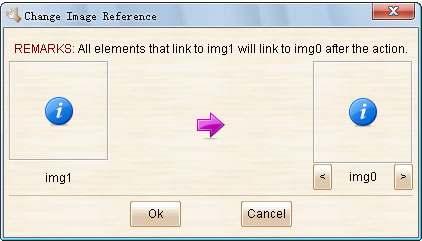
After you click the “Ok” button, all references to img1 will be changed to img0.  So nobody is using img1 now, and you can safely remove img1.

By removing unused images and merging duplicated images, your plot will become much smaller.  You don’t have to do this kind of optimization all the time, but you’d better do it once before exporting the plot to DHTML.

Use Text Box to Replace Big Rectangle

Rectangle is a very frequently used element in prototyping.  However when you want to add a big Rectangle into your plot (e.g. make it as background), you can consider using a Text Box (with border shown, background filled) instead.

Why?  Because the Rectangle element will be converted to an image file when you export the plot to DHTML, bigger Rectangle will generate bigger image file.  While the Text Box will be converted to just a snippet of HTML code, its size will not change when you enlarge the element.  So if you need a big rectangle, consider using a Text Box with border and background first, as long as you don’t need the radius corner feature provided by Rectangle element.

If your plot has many big rectangles and you replace them to Text Box elements, your exported DHTML files will become much smaller.

Conclusion

In this article I introduced three approaches to reduce your plot’s size.  It is not just about saving the space in your hard drive, it can also significantly reduce the DHTML files generated by ForeUI.  If you upload the DHTML files to the Internet for people to review, smaller file size is bandwidth and time saver.  I would suggest all ForeUI users to try using this approaches, and create small and powerful prototypes.