Example 2: Branching the Work flow
Run This Example in New Window
Now let's make something more interesting: branch the work flow and let user to decide which branch to go.
Add a button element into the plot, then follow these steps:
1. Open behavior editor for the button and add the "Element Clicked" event.
2. Click the "Add Branching" button in the bottom toolbar and choose the "User Decision Branching".
3. In the popup window, we input the question that will prompt user: "Do you know my location?".
4. Choose the "Yes" node and click the "Add Action" button to add a "Show Message" action, with a praising message.
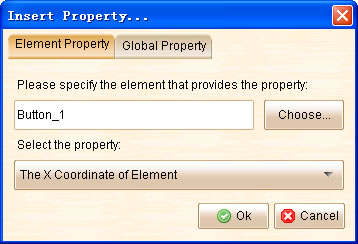
5. Choose the "No" node and click the "Add Action" button to add a "Show Message" action. In the popup message edit window, we click the ![]() button to insert two properties to represent the current location of the button. The property chooser will popup after the
button to insert two properties to represent the current location of the button. The property chooser will popup after the ![]() button is clicked:
button is clicked:

With the help of property chooser, we can find the button element and choose the property that represent the X, Y coordinate.
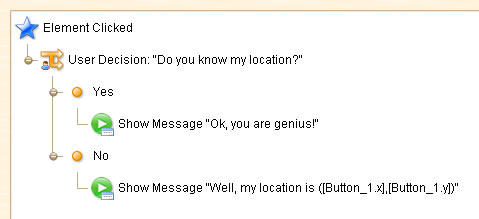
The final element handler should look like this:

You can see two element properties are used in this example: [Button_1.x] and [Button_1.y]. They will be replaced by real coordinate values in the simulation.
Now we can run the simulation, it shows how branching works and the ability to access the element property. You can view this online example to see the result.
In this example we use the "User Decision Branching", which can branch the work flow according user's decision. ForeUI also support another two types of branching:
| • | Conditional Branching: do branching according to the conditions. |
| • | Switch Branching: do branching according to the value of expression. |