Supporting custom element is one of the killer features of ForeUI. This article will introduce the basic knowledge and advanced tricks of custom element creation.
Custom Element Creation
When you are editing your plot, you can always select some elements on the page and pack them as your custom element for future usage, by clicking the ![]() button in floating tool pane (as shown below):
button in floating tool pane (as shown below):

You will be asked to input some information of the custom element. File name may not be so important if you are just saving a custom element for your own usage. You will be able to find the saved custom element file (.fce) in the “<UserDir>/.foreui/customize” directory, where the <UserDir> is your user directory in your system. It will be good practise to input a meaningful element title and description.
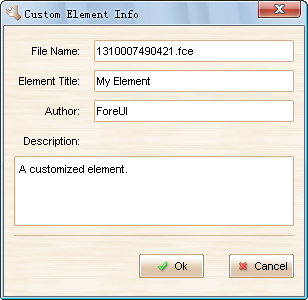
After clicking the “Ok” button, your custom element will be listed in the “Custom Elements” category (you can find it in the “All Elements” category as well). Then you can use it like standard elements.
Functional Custom Element
When you select some elements to create custom element, if the selected elements have behavior defined, the behavior will be packed into custom element as well. That means the custom element can have its own function.
A good example is the “Hyperlink” custom element, which is included in ForeUI installation. You can find it in the “Custom Elements” category, if it is not there, try to load the “Hyperlink.fce” file in the “Custom Elements” category. This custom element is based on the Text Box standard element, and it is functional since it has defined some event handlers:
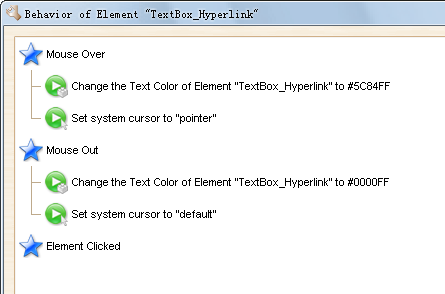
As shown in figure above, it handles the “Mouse Over” and “Mouse Out” events to change its text color and the cursor shape (to simulate a hyperlink). “Element Clicked” event handler is created but it is still empty, you can add some actions that need to be executed when hyperlink is clicked.
The behavior definition is quite “smart”, if you add several instances of Hyperlink custom element into page, each one will have its own behavior, and the corresponding content will be updated as well. For example, you added two instances of Hyperlink custom element:
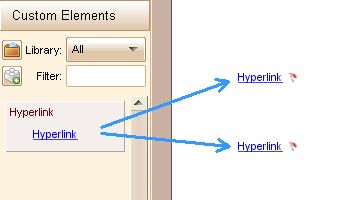
The first instance of Hyperlink will have the id “TextBox_Hyperlink”, and the second instance of Hyperlink will be renamed to “TextBox_Hyperlink_1”. If you check out the behavior of the second instance, you will find its content has be updated to:
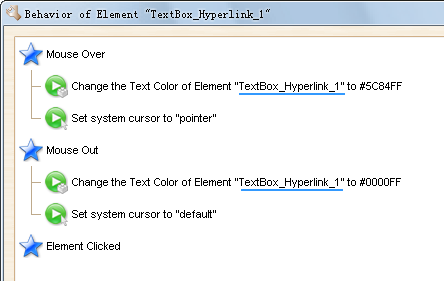
As you can see, the behavior definition of each instance is separated, and they will not interfere each other.
Use Separated User Defined Property and Custom Event
You may already know that, the user defined property and custom event are all in global scope. If you like to define them in your custom element, you will have to consider what will happen if multiple instances are created.
For example, you defined the behavior of a button like this:
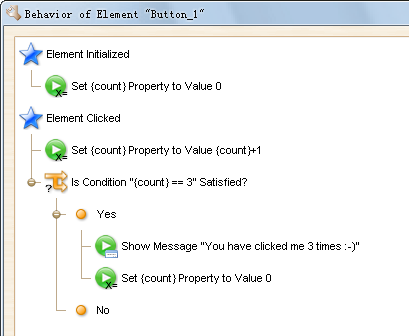
It maintains a user defined property named “count”, so a message box will be shown when you click the button 3 times. If you pack this button as custom element, you will find it works well when it has only one instance in your plot, while it doesn’t work correctly if multiple instances are created, since all instances are using the same global property “count”.
ForeUI does not support user defined property with element scope. Fortunately we have workaround for this case: use the element id as the prefix of global property, thus it become unique for the current element.
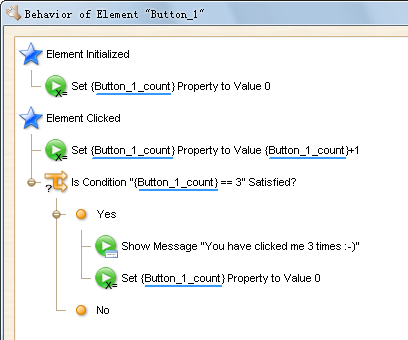
Let’s pack the button as a custom element, and see what happen if multiple instances are added.
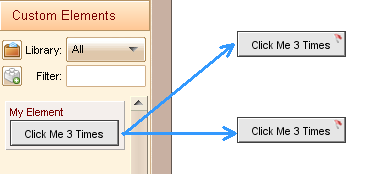
If you check out the second instance of the custom element, you will see its behavior has been changed to:
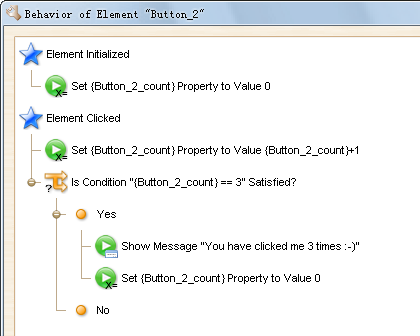
As you can see, the user defined property name has been updated, thus it is still unique for the new instance. By using this trick, the custom element can also work well with multiple instances.
This trick is also applicable for custom event. If you have a custom event defined in a custom element, and wish it become unique for every instance of the element, you can use the element id as the prefix of the custom event name.
